ASSIGNMENT #08
(Due Monday November 3rd)
PART I
Documentary photos (Multiple Pictures)
Make pictures in a documentary style of a social situation.
Become invisible; make pictures.
Shoot in a candid style, with a fly-on-the wall-approach, to make images of real people living their lives. Can be at home, among friends, socializing, nightlife, in public, at school, etc.
BUT, DO NOT attempt this assignment at your job or at work.
At least 50 images should be shot for this assignment, hopefully much more.
This should not be a careless snapshot. Work the subject hard. Get your subject comfortable with the camera being out, so they can forget you are there. This often can take some time.
DO NOT SOCIALIZE with your subject while you are working. Know your purpose; to make images and document. Become invisible. Study examples discussed in class. Do not submit non-documentary style images.
Submit (3) images of different situations but of the same subject. DO NOT submit variations of the same image. Carefully edit your take, looking for images of visual interest, and candor.
Be prepared to use your flash if necessary. Keep in mind some of the elements of good composition, avoiding; cluttered and distracting backgrounds, objects appearing behind heads, dead space, etc.
-CAPTION: be sure to get subject’s names and brief description of what they are doing,; who, what, when, where, why.
*Students must complete:
1. Select (3) best photos.
2. SLUG PHOTO AS FOLLOWS:
Last name_ documentary01.jpg, Last name_ documentary02.jpg, etc.
EXAMPLE: franklin_ documentary01.jpg
3. Place images in the “drop folder.”
PART II
Research Project:
1. What was Life Magazine known for?
2. When was it published?
3. Select (1) Life staff photographer of importance and be prepared to talk to the class about your selection.
4. Have online link to sample of photographer’s work, or bring in a back-copy of the former magazine. Hint: Ask your parents or Grandparents.
PART III
Read this essay and interactive page.
http://chnm.gmu.edu/fsa/index.html
10/26/08
FALL '08 FINAL PROJECT ASSIGNMENT
FINAL PROJECT
Due during final class Monday December 15th
The Final Project is a 4-5 week project that requires each student to spend significant time with a chosen subject, to produce a well-crafted, in-depth photo essay.
Each student must submit a written proposal; which must meet the requirements of the assignment and approval by the instructor.
The Final Project is NOT a single event or photo shoot. It should be a subject of social importance and thus worthy of a 4-5 week essay. The essay should tell a story.
Each student must develop their essay on a week-to-week basis, and bring photos in each week for critique. The final essay will consist of an 8-10 image slideshow.
The Final Project makes 25% of your grade and is due the final week.
REMEMBER: The Photo Essay is equivalent to a Final Exam.
Due Monday November 10th
WRITTEN PROPOSAL FOR FINAL PROJECT / Photo Essay
Each student must submit a well-written, thoroughly planned proposal (250 words or 3-4 paragraphs). The proposal must be an examined, well-planned, and strongly supported idea.
Your proposal will be evaluated and part pf your grade.
Select a story idea, theme, or subject that will be both interesting and visual. You will need to photograph this subject in various stages over the final 4-5 weeks, so make it something good! Something you can spend time with and revisit multiple times.
It should be a subject worthy of a photo essay. Think of some of the work we have reviewed in class. It must also be accessible to you. Don’t select a subject that you can’t get to each week, select an idea that is do-able.
Do NOT select an uninteresting and simplistic subject, such as; my roommate, my dog, or my girlfriend/boyfriend. Select something that has substance, something complex that can be revisited many times and in different ways.
The proposal should outline in detail 4-5 different aspects that you can document, not just one thing repeated each week. This how real photojournalists get their work published. They pitch story ideas to editors. Each story proposal usually has to be approved by a series of editors, and a poorly throughout proposal will quickly dismissed by an editor.
PROPOSAL IS PART OF YOUR GRADE.
REQUIREMENTS:
The Final Project is due Monday December 15th during FINAL CLASS.
Attendance required. No exceptions
-Each project must consist of at least 8 different images, no more than 10.
-Project should include at least one: vertical, detail, and overall.
-At least (5) photos must contain people.
-Each image must be captioned properly in File Info.
-The first image in your series MUST have a brief summary of your project, in addition to the caption. 2-3 sentences, be brief and concise.
-Each image must be slugged properly
(lastname_final 01.jpg, lastname_final 02.jpg, etc
-Each image must be cropped, toned, sized, etc in Photoshop
-Each image should be sized to 10 inches at longest side, 200dpi
-Each image should be less than 2MGS. Save it at a lower compression if too big.
-Sequence your images in the best story telling manner
-YOU WILL BE GRADED ON WELL YOU MEET THESE REQUIREMENTS, AS WELL AS THE OVERALL IMPACT OF YOUR PHOTOS.
-PROJECT SHOULD REFLECT 4-5 WEEKS OF WORK.
PLEASE FOLLOW INSTRUCTIONS CAREFULLY!
FINAL PROJECT CHECKLIST:
1. be sure you submitted to the DROP updated final proposal, if you changed topics.
Slug: franklin_finalproposal.doc
2. make sure all photos are captioned.
3. sequence photos, take special care to put photos in order.
4. slug photos properly.
5. Photoshop & size each image properly.
6. submit 8-10 final photos to the DROP when you are done
Slug: lastname_final01.jpg, lastname_final02.jpg, etc.
10/20/08
FALL '08 WEEK 7

MAKE NOTE:
Exam: November 24th. No exceptions.
Start thinking about a Final Project subject, be prepared to discuss (3) idea's next week.
TODAY'S AGENDA
1. Photos of the Week
2. Let's look, ASSIGNMENT #6; Live Event
3. Lesson; LIGHT part II; More Flash Use
4. ASSIGNMENT, Photojournalist Paper. Made contact yet?
5. Roger Fenton and Matthew Brady
6. Early Photographic Processes
7. ASSIGNMENT #7; Using Flash, & other
FALL '08 ASSIGNMENT #07 FLASH USE & other
ASSIGNMENT #07
(Due 10/27/08)
Flash Usage (2 parts) Rock Star
Find a musician(s) to photograph, or an actor(s) to play a musician, and make an album/CD cover shots USING YOUR FLASH both indoors and outdoors.
PART1. Photograph your musician indoors using a camera flash.
Be creative, and make personality driven images, highlighted by excellent lighting. Make well-composed and expressive photos of a person using your flash. Must be taken indoors.
***You will be graded on your creativity and use of flash.***
-Flash use should be executed perfectly.
-Set proper white balance setting be sure to have correct white balance usage.
-Use bounce flash whenever possible.
-AVOID: red eye, shadows behind heads, and other forms of sloppy flash use.
Keep in mind some of the elements of good composition, avoiding; cluttered and distracting backgrounds, objects appearing behind heads, dead space, etc. Fill the frame, making interesting, personality-filled photos, that have impact. Composition, positioning, background, lighting, and lens selection should all be taken into consideration. -consider the various flash techniques, such as: bounce flash, fill-flash, diffused flash.
PART 2. Photograph your musician outdoors using a camera flash.
This should be a different set-up than the indoor images.
Can be taken during daytime, night-time, or twilight.
Be creative, and make personality driven images. Make well-composed and expressive photos of a person using your flash. Must be taken indoors.
***You will be graded on your creativity and use of flash.***
-Flash use should be executed perfectly.
-Set proper white balance setting, be sure to have correct white balance usage.
-Use bounce flash whenever possible.
-AVOID: red eye, shadows behind heads, and other forms of sloppy flash use.
Keep in mind some of the elements of good composition, avoiding; cluttered and distracting backgrounds, objects appearing behind heads, dead space, etc. Fill the frame, making interesting, personality-filled photos, that have impact. Composition, positioning, background, lighting, and lens selection should all be taken into consideration. -consider the various flash techniques, such as: bounce flash, fill-flash, diffused flash.
****Study methods discussed in class and in reading material.
Students must complete:
1. Select (1) best photo for each part. (2) total.
2. SLUG PHOTO AS FOLLOWS:
Last name_flash00.jpg
EXAMPLE: franklin_ flash01.jpg franklin_ flash02.jpg
3. Place images in the “drop folder.”
PART 3
READING:
National Geographic Field Guide
By Peter k. Burian & Robert Caputo
Read pages 76-111
Guide to Photojournalism
By Brian Horton
Read pages 79-101“Features and Portraits; Seeing the World Around Us.”
Visual Journalism
By Christopher R. Harris & Paul Martin Lester
Read pages 63-86“Technical Considerations.”
PART 4. Research assignment:
Who was Dorothea Lange and Walker Evans and what large photographic project were they part of?
PART 5. Bring your camera to class next week, ready to use.
PART 6. Bring (3) Final Project subject ideas, be prepared to discuss next week.
10/19/08
FALL '08 MATHEW BRADY
MATHEW B. BRADY
(1822 -1896)

Mathew Brady arrived in New York City at the age of sixteen. Soon after taking a job as a department store clerk, he started his own small business manufacturing jewelry cases. In his spare time, Brady studied photography under a number of teachers, including Samuel F. B. Morse, the man who had recently introduced photography to America. Brady quickly discovered a natural gift. By 1844, he had his own photography studio in New York.
Brady soon acquired a reputation as one of America's greatest photographers -- producer of portraits of the famous. In 1856, he opened a studio in Washington, D.C., the better to photograph the nation's leaders and foreign dignitaries. As he himself said, "From the first, I regarded myself as under obligation to my country to preserve the faces of its historic men and mothers." He became one of the first photographers to use photography to chronicle national history.
At the peak of his success as a portrait photographer, Brady turned his attention to the Civil War. Planning to document the war on a grand scale, he organized a corps of photographers to follow the troops in the field. Friends tried to discourage him, citing battlefield dangers and financial risks, but Brady persisted. He later said, "I had to go. A spirit in my feet said 'Go,' and I went."
Mathew Brady did not actually shoot many of the Civil War photographs attributed to him. More of a project manager, he spent most of his time supervising his corps of traveling photographers, preserving their negatives and buying others from private photographers freshly returned from the battlefield, so that his collection would be as comprehensive as possible. When photographs from his collection were published, whether printed by Brady or adapted as engravings in publications, they were credited "Photograph by Brady," although they were actually the work of many people.
In 1862, Brady shocked America by displaying his photographs of battlefield corpses from Antietam, posting a sign on the door of his New York gallery that read, "The Dead of Antietam." This exhibition marked the first time most people witnessed the carnage of war. The New York Times said that Brady had brought "home to us the terrible reality and earnestness of war."
After the Civil War, Brady found that war-weary Americans were no longer interested in purchasing photographs of the recent bloody conflict. Having risked his fortune on his Civil War enterprise, Brady lost the gamble and fell into bankruptcy. His negatives were neglected until 1875, when Congress purchased the entire archive for $25,000. Brady's debts swallowed the entire sum. He died in 1896, penniless and unappreciated. In his final years, Brady said, "No one will ever know what I went through to secure those negatives. The world can never appreciate it. It changed the whole course of my life."
Despite his financial failure, Mathew Brady had a great and lasting effect on the art of photography. His war scenes demonstrated that photographs could be more than posed portraits, and his efforts represent the first instance of the comprehensive photo-documentation of a war.
Biographical Note /LIBRARY OF CONGRESS
http://www.sonofthesouth.net/leefoundation/About%20Mathew%20Brady.htm
http://www.mathewbrady.com/
http://memory.loc.gov/pnp/cwp/4a40000/4a40900/4a40924r.jpg
http://memory.loc.gov/pnp/cwp/4a40000/4a40900/4a40924r.jpg
The Library of Congress presents these documents as part of the record of the past.
10/12/08
FALL '08 WEEK 6

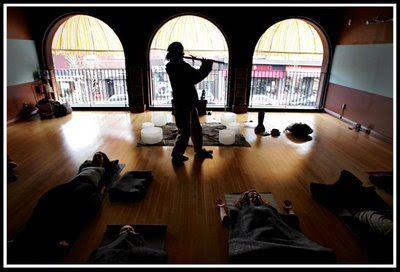
photo by THOMAS E. FRANKLIN / The Record
LOCATION LIGHTING. Was a camera flash used in this photo, in mid-day sun?
TODAY'S AGENDA
**shortened class today**
1. Photos of the Week; The Record
2. Let's look, ASSIGNMENT #5; Light
3. Lesson; LIGHT part II; Flash Use
4. Due next week: ASSIGNMENT #6; Covering a Live Event
5. ASSIGNMENT, Photojournalist Paper. Made contact yet?
6. Research assignment for next week: Who was Roger Fenton and Matthew Brady, and what did they have in common? Be prepared to discuss next week.
7. Bring your camera to class next week, ready to use.
10/6/08
FALL '08 WEEK 5

photo by THOMAS E. FRANKLIN / The Record
LOCATION LIGHTING. How was this photo lit and made to look like this?
TODAY'S AGENDA
1. Covering a live assignment
2. Photos from last week's VP Debate, Group editing exercise
3. Let's look, ASSIGNMENT #4, Composition.
4. Lesson; LIGHT part I
5. ASSIGNMENT #5; Lighting
6. ASSIGNMENT #6; Covering a Live Event
6. ASSIGNMENT, Photojournalist Paper
7. Photo essay; "Bound to El Norte."
10/5/08
FALL '08 ASSIGNMENT #06; Covering a Live Event
ASSIGNMENT #06
(Due Monday October 20th –two weeks)
Live Event (Multiple Pictures)
Cover a Live Event / Multiple Pictures
Select a scheduled public event and photograph all aspects of the event in the form of a photo essay. Be sure to shoot various scenes, including overalls and details, and illustrate what the event is about. Get photos of all the important people and subject matter.
Select a carefully chosen event to shoot, thus you have two weeks to plan.
Suggestions; news event, parade, protest, performance, festival, theme, etc.
Do not shoot a sporting event. Check newspaper, campus fliers, and magazine listings for a schedule of events in your area. Select an event that will be visual, not something static like someone standing at a podium talking. Think of some of the work reviewed in class. Your event selection is key, give it some thought and planning.
Be prepared to use your flash if necessary. Keep in mind some of the elements of good composition, avoiding; cluttered and distracting backgrounds, objects appearing behind heads, dead space, etc. Fill the frame, making interesting photographs that have impact. Composition, positioning, background, and lens selection should all be taken into consideration.
Photos as a collection should illustrate what the event is about.
1.PUT ALL YOUR PHOTOS IN YOUR PUBLIC FOLDER
2. Select (4) different images must be submitted. Be sure to include:
-people in at least (3) photos.
-(1) over-all, scene setter.
-(1) detail or close up. Can be of a person. Make it relevant.
-CAPTION: be sure to get subject’s names and brief description of what they are doing,; who, what, when, where, why.
*Students must complete:
1. Select (4) best photos, including; an overall & detail.
2. SLUG PHOTO AS FOLLOWS:
Last name_live event1.jpg Last name_ live event2.jpg
EXAMPLE: franklin_ live event1.jpg
franklin_ live event2.jpg
3. Place images in the “drop folder.”
READING:
Guide to Photojournalism
By Brian Horton
Read pages 54-77
“News: Sensitivity, Thinking, Instinct and Curiosity”
Read pages 131-152
“Lessons; Horst Faas, J.Pat Carter, Alan Diaz”
FALL '08 ASSIGNMENT #05; LIGHTING
ASSIGNMENT #05
(Due 10/13/08)
Light (2 parts)
1. Portrait or feature photo with strong sense of ARTIFICIAL light, without flash:
Make well-composed and expressive personality portrait photo using one of the lighting techniques discussed in class. Photo should have exceptionally strong quality of light. Lighting technique should be very obvious.
This need not be a documentary-style photo, but do not manipulate the image in Photoshop.
-Do NOT USE A CAMERA FLASH!!!!!!!!!
Lighting must be natural; sun, or cloudy day. Can be indoors or outdoors.
Keep in mind some of the elements of good composition, avoiding; cluttered and distracting backgrounds, objects appearing behind heads, dead space, etc. Fill the frame, making interesting photos that have impact.
Composition, perspective, background, and lens selection should all be taken into consideration. Consider the various lighting techniques discussed in class; directional light, soft light, window light, back light, etc.
2. Portrait or feature photo with strong sense of NATURAL light, without flash:
Make well-composed and expressive personality portrait photo using one of the lighting techniques discussed in class. Photo should have exceptionally strong quality of light. Lighting technique should be very obvious. This need not be a documentary-style photo, but do not manipulate the image in Photoshop.
-Do NOT USE A CAMERA FLASH!!!!!!!!!
Lighting must be from an artificial light, such as a lamp or bulb. Can be indoors or outdoors, day or night.
Keep in mind some of the elements of good composition, avoiding; cluttered and distracting backgrounds, objects appearing behind heads, dead space, etc. Fill the frame, making interesting photos that have impact.
Composition, perspective, background, and lens selection should all be taken into consideration. Consider the various lighting techniques discussed in class; directional light, soft light, window light, back light, etc.
Review examples showed in class and Power Point Presentation.
Lighting MUST be the key element in these photos.
*Students must complete:
1. Select best photo from each part, submit (2) photos.
2. SLUG PHOTO AS FOLLOWS:
Last name_natural.jpg, Last name_artificial.jpg
EXAMPLE: franklin_natural.jpg
franklin_artificial.jpg
READING:
National Geographic Field Guide
By Peter k. Burian & Robert Caputo
Read pages 76-111
Guide to Photojournalism
By Brian Horton
Read pages 79-101“Features and Portraits; Seeing the World Around Us.”
Visual Journalism
By Christopher R. Harris & Paul Martin Lester
Read pages 63-86“Technical Considerations.”
LIGHT LESSON; Part I
LIGHT
Appropriate light suitable for the subject, is one of the key’s to good photographs. Lighting is one of the hardest things to get right in a photograph. Too much light, too little light, or a combination
of the two, can ruin a photo.
If you understand the types of lighting, how they affect your camera, you can do to use these effects to your full advantage.
CONSIDER:
-Think about the quality of light before you shoot, think about possible alternatives.
-Ask yourself, is this the best way to light this shot, and am I standing in the best spot to make the picture?
-How can I best use the available light?
-Do I need my flash or not? You should decide, not your camera!
-Experiment with the light
-Look closely at how light and shadow work together to create texture on subjects.
-Seeing with light and really seeing the light takes time. Sometimes, it'll stop you in your tracks, and you will be mesmerized by it.
9/29/08
FALL '08 WEEK 4

By now we should be well aware of the technical considerations that determine a photograph, such as aperture, shutter speed, lens selection, and camera types. You should also be familiar with the categories of the "Visual language."
So, in looking at Dorothea Lange's iconic "Migrant Mother," a symbol of the Great Depression era, what can your determine?
Could it be...that some submitted photos are not slugged correctly or contain proper captions....
Be sure to review the Powerpoint Presentations, they contain material not always covered in class, due to time restriction.
Agenda for today's class.
1.Photos of the week; MSNBC
2. Let's look, ASSIGNMENT #3, Selective Focus.
3. Lesson; Composition
4. ASSIGNMENT #4, Composition
5. ASSIGNMENT, Photojournalist Paper
6. Photo essay; “After the Fire”
9/28/08
FALL '08 COMPOSITION
-the primary factor in good photography.
-the visually creative aspect of image making.
***please refer to the Week 4 Powerpoint Presentation for more examples.
BAD COMPOSITION
a badly composed photo will lesson impact or effect.
MOST COMMON CAUSES OF BAD COMPOSITION:
1. cluttered backgrounds
2. tiny objects, or main subjects in dead center of frame
3. irrelevant space dominating frame
4. background object coming out of ears, heads,etc
5. Unnecessary objects and information inside the frame.
6. DEAD SPACE!!!!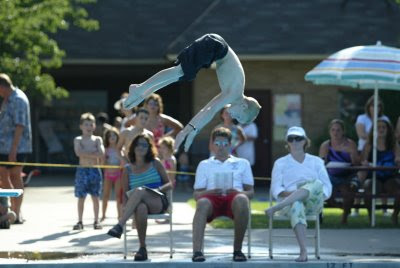
 DEAD SPACE
-eliminate all clutter and distractions.
-use the image frame or depth-of-field to clean-up images.
-one of the biggest most common problem with photos.
-compose with the camera whenever possible.
-crop the final image when necessary.
Remember, you want your photos to communicate and have optimum impact.
FUNDAMENTALS OF GOOD COMPOSITION
1. Rule of Thirds
a.off center placement of subject
b. center is usually NOT satisfying resting place for eye
c. when subject is centered, viewer is unlikely to explore other areas
d. compose image so there is secondary subject for eye to explore
photo by Thomas E. Franklin \ The Record
2. Framing
a. find object in foreground to use as a frame for primary subject
b. framing object should have aesthetic value
ex. doorway, archway, overhanging branches, people, etc
c. frame should compliment subject

photo by Thomas E. Franklin \ The Record
3. Dramatic Sky
a. emphasize skies by placing horizon low in frame, rule of thirds.
photo by Thomas E. Franklin \ The Record
4. Leading Lines
a. find an element that will lead viewer’s eye into the image.
***just because a photo has lines or visual elements in the shape of lines, does not mean the photo is a leading lines image. note the difference.
5. Layering
a. Create Depth
b. create foreground, middle ground, background.
c. very effective compositional technique in creating memorable, lasting images, especially when there are multiple layers to attract the eye.
photo by Thomas E. Franklin \ The Record


photos by John Stanmeyer / VII
6. Fill Frame
a. fill the composition with the subject.
b. usually shot with long lens (telephoto).
c. often has immediate impact.

photos by Thomas E. Franklin \ The Record
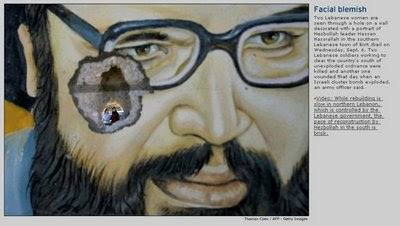
7. Juxtaposition
a. visually opposing subjects within a photo.
b. often conveying irony, or play between two objects or subjects.
c. one of the most effective and powerful story-telling devices.
photo by Thomas E. Franklin \ The Record
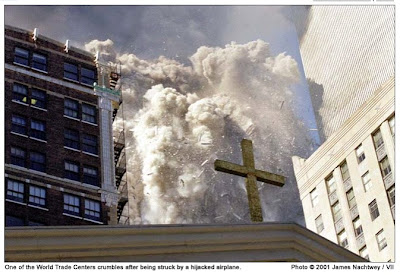
photo by James Nachtwey \ VII
photo by Keith Carter
8.Silhouette
a. view of an object or scene consisting of the outline and a featureless interior.
b. dark subject, often in complete shadow, in front of a light background.


photos by Thomas E. Franklin \ The Record
-the visually creative aspect of image making.
***please refer to the Week 4 Powerpoint Presentation for more examples.
BAD COMPOSITION
a badly composed photo will lesson impact or effect.
MOST COMMON CAUSES OF BAD COMPOSITION:
1. cluttered backgrounds
2. tiny objects, or main subjects in dead center of frame
3. irrelevant space dominating frame
4. background object coming out of ears, heads,etc
5. Unnecessary objects and information inside the frame.
6. DEAD SPACE!!!!

 DEAD SPACE
-eliminate all clutter and distractions.
-use the image frame or depth-of-field to clean-up images.
-one of the biggest most common problem with photos.
-compose with the camera whenever possible.
-crop the final image when necessary.
Remember, you want your photos to communicate and have optimum impact.


FUNDAMENTALS OF GOOD COMPOSITION
1. Rule of Thirds
a.off center placement of subject
b. center is usually NOT satisfying resting place for eye
c. when subject is centered, viewer is unlikely to explore other areas
d. compose image so there is secondary subject for eye to explore

photo by Thomas E. Franklin \ The Record
2. Framing
a. find object in foreground to use as a frame for primary subject
b. framing object should have aesthetic value
ex. doorway, archway, overhanging branches, people, etc
c. frame should compliment subject

photo by Thomas E. Franklin \ The Record


3. Dramatic Sky
a. emphasize skies by placing horizon low in frame, rule of thirds.

photo by Thomas E. Franklin \ The Record
4. Leading Lines
a. find an element that will lead viewer’s eye into the image.
***just because a photo has lines or visual elements in the shape of lines, does not mean the photo is a leading lines image. note the difference.

5. Layering
a. Create Depth
b. create foreground, middle ground, background.
c. very effective compositional technique in creating memorable, lasting images, especially when there are multiple layers to attract the eye.

photo by Thomas E. Franklin \ The Record


photos by John Stanmeyer / VII
6. Fill Frame
a. fill the composition with the subject.
b. usually shot with long lens (telephoto).
c. often has immediate impact.


photos by Thomas E. Franklin \ The Record
7. Juxtaposition
a. visually opposing subjects within a photo.
b. often conveying irony, or play between two objects or subjects.
c. one of the most effective and powerful story-telling devices.

photo by Thomas E. Franklin \ The Record

photo by James Nachtwey \ VII

photo by Keith Carter
8.Silhouette
a. view of an object or scene consisting of the outline and a featureless interior.
b. dark subject, often in complete shadow, in front of a light background.


photos by Thomas E. Franklin \ The Record
9/27/08
FALL '08 ASSIGNMENT -Photojournalist Paper
Photojournalist Paper
Due 11/3/08
Each student will be required to select and contact a working photojournalist of choice, accompany them on an assignment, conduct an interview and write a paper on the experience.
The project will require research and preparation, and the ability to contact and meet with the photojournalist. Every effort should be made to try and accompany the photojournalist on an assignment.
***WEDDING & COMMERCIAL PHOTOGRAPHERS ARE NOT PERMITTED. WORKING PHOTOJOURNALISTS & NEWS PHOTOGRAPHERS ONLY! SELECT SOMEONE WITH REAL EXERIENCE –at least 5 years.
The goal of this presentation is for students to learn something about the field of photojournalism, which is undergoing cataclysmic changes, from a working professional who can offer insight. In addition to the list of questions below, students should prepare their own set of questions. Research on photographer’s background should be completed BEFORE interview session.
Be inquisitive. Get their advice. Get a sense of the photographer’s attitude, style, and perspective. This is a unique opportunity to get some real career insight, even in photojournalism is not in your future. There is much that can be learned from professionals in related fields. Make the most of the opportunity.
1. The written paper should be minimum 2000 words (2-3 pages, no more), and written in the student’s own words..
The written report must be a WORD document.
-12pt font, single-space, and submitted to the DROP FOLDER.
2. Shoot your own photo of the photojournalist, hopefully in action.
-Copy and paste 1-2 photos into WORD document.
3. The paper MUST follow this outline:
I.BACKGROND
-Why was photographer selected?
-What is the photographer’s background?
-How did they get interested and started?
-Etc.
II. PHOTOGRAPHY WORK
-What type of work or projects is the photographer known for?
-List examples, and gives description.
-Copy and paste at least 2 photos into WORD document.
-Who do they work for now, in the past?
-Describe their job/assignments.
Etc.
III. JOB
-Describe their job/assignments.
-What aspects of their jobs are most satisfying?Least satisfying?
-What advice do they have for young journalists?
-What are the most important skills to have to be a successful photojournalist?
-What changes in the business have they experienced?
-What does the future hold for photojournalists?
DO’s AND DON’Ts:
-Do not wait until the last minute to contact the photographer. DO IT NOW!
-Do not expect the photographer to get back to you immediately, if at all.
-Be persistent and assertive, and don’t wait for returned calls. Be proactive.
-Do research BEFORE contacting them. Impress them with what you already know about them. This will most likely lead to a better interview, and will show respect for their time.
-Ask for help in making initial contact.
-Make every opportunity to accompany them on an assignment.
Where to find a photojournalist?
-Get in the habit of looking for credits under published photos.
-your local newspaper
-Visit photojournalism web sites:
www.njppa.org (New Jersey Press Photogs Association)
www.nppa.org (National Press Photogs Association)
www.digitaljournalist.org Dirck Halstead (very important site!)
www.sportshooter.com (not just sports)
http://www.aphotoaday.org/ (a photo a day web site & blog)
-The Star-Ledger
-The Record
-The Asbury Park Press
-The Herald News
-The NY Times
-Review the PPP’s.
-Ask me.
FALL '08 ASSIGNMENT #04; Composition
ASSIGNMENT #05
(Due 10/6/08)
Composition (2) parts
READING:
Guide to Photojournalism
By Brian Horton
Read pages 79-101“Features and Portraits; Seeing the World Around Us.”
PART 1: Make a Graphic photograph using “Rule of Thirds.
PART 2: Make a Graphic photograph using one of these compositional techniques: Framing, Leading Lines, Juxtaposition, or Silhouette.
****CAPTION MUST STATE WHICH TECHNIQUE YOU ARE USING!
Remember, a Graphic Photograph is visual, emphasizes the relationship between the lines, shapes and forms produces an aesthetically pleasing visual presentation.
It is NOT about the subject content as much as the visual content.
Graphic elements are more important than the story-telling content with this assignment.
Photo should have exceptionally strong composition, and be visually pleasing.
This should be a photo that is as much about the “visual elements,” as it is about the content and subject.
Take a look at the world around us, and make a visually interesting photograph.
This should not be a portrait.
Review examples showed in class and Power Point Presentation.
This should be a photo about Graphic Elements above all else.
THE GRAPHIC ELEMENTS SHOULD BE OBVIOUS, AND EMPHASIZED!
*Students must complete:
1. Select (1) best photo. 2. Follow “Basic Photoshop”, use outline provided if needed.
3. Type complete caption in FILE INFO field in Photoshop, see instructions. 4.SLUG PHOTO AS FOLLOWS: Last name_ composition1.jpg, Last name_ composition2.jp 5. Place image in the “drop folder”
(remember to save a copy for yourself to you folder)
9/21/08
FALL '08 WEEK 3
 photo by THOMAS E. FRANKLIN
Good-morning.
Welcome to Week 3.
Wow, I was very impressed with the photos from Week 1, we saw some really nice self-portraits and photos of self-expression. Let's keep up the good work.
Housekeeping:
-when reviewing the Powerpoint presentation, copy the PPP file to your HD then open from there. (Opening a large file like that across the server will put a drain on server, and in some cases crash)
-do NOT put folders in the DROP folder, just drag and drop the images solo. Thank you.
-be sure to CAPTION every submitted photo, otherwise 1pt will subtracted from each assignment.
-be sure to slug each photo correctly, otherwise 1pt will subtracted from each assignment.
-check the Graded Assignments Folder.
Agenda for today's class.
1. Damon Winter on Obama Trail
2. Any work-flow issues?
3. Let's look, ASSIGNMENT #2, Depth-of-field & Motion.
4. Ethic's & Responsibilities; See NPPA Code
5. The Visual Language
6. Photo Basic's PART II; Cameras
7. Photo Basic's PART III; Lenses
8. ASSIGNMENT #3, Selective Focus
9. Photo essay; “Bound to El Norte”

9/20/08
LENSES
LENSES:
Wide-angle Lens: A lens that has a shorter focal length and a wider field of view (includes more subject area) than a normal lens.
Zoom Lens: A lens in which you adjust the focal length over a wide range. In effect, this gives you lenses of many focal lengths.
Telephoto Lens: A lens that makes a subject appear larger on film than does a normal lens at the same camera-to-subject distance. A telephoto lens has a longer focal length and narrower field of view than a normal lens. -KODAK: A Glossary of Photographic Terms


OPTICAL vs.DIGITAL ZOOM
Most consumer-grade digital cameras offer optical and digital zoom.
Ignore the digital zoom.
Your photos will be at their sharpest with the optical zoom, turn off the digital zoom. Why?
Optical zoom uses the optics of the lens of the camera to bring the subject closer. Digital zoom is an invention that enlarges that image within the camera.
Optical zoom is what the lens actually sees. This is what matters most .
.
-optical zoom is a true zoom.
It's focal length actually extends and retracts. An image is magnified by the lens itself.
-An optical zoom produces quality images.
-A zoom lens is used to magnify an image 3X, 4X, 10X and more.
-If you want to zoom in close to distant objects, buy a camera with the longest zoom you can afford.
-NOTE: Very long zooms are prone to camera shake, particularly in low light. To help prevent this, some digital cameras have image stabilization.
 Digital zoom uses in-camera technology to enlarge the pixels in the image the optical zoom captures, then enlarges them. The result is poor; loss of sharpness, color, and image detail.
A digital zoom is not a true zoom.
-It is a simulated zoom that enlarges the central portion of an image.
-The actual length of the lens does not change.
-A digital zoom pre-crops the center area of an image. Resolution is reduced, giving the appearance of zooming in.
-It is similar to cropping with photo editing software.
-A digital camera may have an option to turn off the digital zoom.TURN IT OFF!
Optical Zoom vs. 35mm lens
-Expressing focal lengths in terms of 35mm equivalent makes it easier for individuals to understand so they can compare digital camera lenses.
-The focal length is the same on all 35mm cameras because the size of the film each uses is the same.
-Digital cameras, however, have different focal lengths because the size of their image sensors vary from one camera to another.
-3x optical zoom on one digital camera may not give the same magnification as another with a 3x zoom.
EXAMPLE: The Nikon 5400 has a 4x zoom, which has a 116mm equivalent focal length. But Nikon 5200, which has a 3x zoom, has a 115mm equivalent focal length.
-Not much difference yet one is a 3x and the other is 4x. This is why it's important to ask the 35mm equivalent when looking for a specific focal length.
FOCUS
Digital cameras have different methods of focusing, so check the manual.
When using an automatic mode, focus is locked when the shutter-release button is pressed half-way down. Correct use of the two-step shutter button is key to obtaining proper focus.
The LCD or electronic viewfinder indicates when, and sometimes where, focus is locked.
Usually there is a visual indicator, such as a small lamp or change in color of the focus indicator, that confirms when focus is achieved.
Focus is fixed until you press the focus button again or switch to a different focus mode.
Wide-angle Lens: A lens that has a shorter focal length and a wider field of view (includes more subject area) than a normal lens.
Zoom Lens: A lens in which you adjust the focal length over a wide range. In effect, this gives you lenses of many focal lengths.
Telephoto Lens: A lens that makes a subject appear larger on film than does a normal lens at the same camera-to-subject distance. A telephoto lens has a longer focal length and narrower field of view than a normal lens. -KODAK: A Glossary of Photographic Terms


OPTICAL vs.DIGITAL ZOOM
Most consumer-grade digital cameras offer optical and digital zoom.
Ignore the digital zoom.
Your photos will be at their sharpest with the optical zoom, turn off the digital zoom. Why?
Optical zoom uses the optics of the lens of the camera to bring the subject closer. Digital zoom is an invention that enlarges that image within the camera.
Optical zoom is what the lens actually sees. This is what matters most
 .
.-optical zoom is a true zoom.
It's focal length actually extends and retracts. An image is magnified by the lens itself.
-An optical zoom produces quality images.
-A zoom lens is used to magnify an image 3X, 4X, 10X and more.
-If you want to zoom in close to distant objects, buy a camera with the longest zoom you can afford.
-NOTE: Very long zooms are prone to camera shake, particularly in low light. To help prevent this, some digital cameras have image stabilization.
 Digital zoom uses in-camera technology to enlarge the pixels in the image the optical zoom captures, then enlarges them. The result is poor; loss of sharpness, color, and image detail.
A digital zoom is not a true zoom.
-It is a simulated zoom that enlarges the central portion of an image.
-The actual length of the lens does not change.
-A digital zoom pre-crops the center area of an image. Resolution is reduced, giving the appearance of zooming in.
-It is similar to cropping with photo editing software.
-A digital camera may have an option to turn off the digital zoom.TURN IT OFF!
Optical Zoom vs. 35mm lens
-Expressing focal lengths in terms of 35mm equivalent makes it easier for individuals to understand so they can compare digital camera lenses.
-The focal length is the same on all 35mm cameras because the size of the film each uses is the same.
-Digital cameras, however, have different focal lengths because the size of their image sensors vary from one camera to another.
-3x optical zoom on one digital camera may not give the same magnification as another with a 3x zoom.
EXAMPLE: The Nikon 5400 has a 4x zoom, which has a 116mm equivalent focal length. But Nikon 5200, which has a 3x zoom, has a 115mm equivalent focal length.
-Not much difference yet one is a 3x and the other is 4x. This is why it's important to ask the 35mm equivalent when looking for a specific focal length.
FOCUS
Digital cameras have different methods of focusing, so check the manual.
When using an automatic mode, focus is locked when the shutter-release button is pressed half-way down. Correct use of the two-step shutter button is key to obtaining proper focus.
The LCD or electronic viewfinder indicates when, and sometimes where, focus is locked.
Usually there is a visual indicator, such as a small lamp or change in color of the focus indicator, that confirms when focus is achieved.
Focus is fixed until you press the focus button again or switch to a different focus mode.
CAMERA TYPES
I. DIGITAL CAMERAS
A digital camera takes still photographs digitally by recording images on a light-sensitive sensor. Digital cameras often feature an LCD screen that display captured images immediately after it is recorded. They also have the capacity to  take many images onto a small memory device; usually a compact flash card or memory stick, which can be reused.
Many compact digital still cameras can record sound and moving video as well.
1. Digital SLR's
A digital single-lens reflex camera (digital SLR or DSLR) is a digital camera that uses a mirror system to direct light from the lens through the viewfinder eyepiece.
During exposure (when the photograph is taken), the mirror swings upward, and a shutter opens, allowing the lens to project light onto the image sensor.
Most commonly used camera by working photojournalists.
Uses interchangeable lenses.
PROS: High-end cameras, top-notch quality, all-features available, large LCD screens, large sensors, large file size.
CONS: Expensive, large and heavy, no video capability.
2. Bridge digital cameras
 The term "bridge" characterizes the way in which these cameras fill the niche between the DSLRs and the compact digital cameras.
Bridge digital cameras are comparable in size and weight to the smallest digital single-lens reflex cameras (DSLRs), but they lack the removable lenses, larger sensors, mirror, and reflex system that characterize DSLRs.
PROS: Good to excellent quality, many features available, large LCD screens, large sensors, large file size, less expensive.
CONS: Not as capable as DSLR's, lens quality not as good as as DSLR's, not durable.
3. Compact digital cameras
Designed to be fully automatic, small and portable; the smallest are described as subcompacts or "ultra-compacts". Compact cameras are usually designed to be easy to use, sacrificing advanced features and picture quality for compactness and simplicity.
Often referred to as point-n-shoot, or idiot cameras due to their overly automatized features.
PROS: small and portable, designed to be easy to use, numerous advanced features, all-inclusive features.
CONS: Picture quality are sacrificed for compactness and simplicity, most have a built-in flash usually of low power only sufficient for nearby subjects, delicate.
This site has a good chart comparing point-n-shoots.
II. FILM CAMERAS
1. 35mm (24x36mm)
 *Began being used in 1940’s. Still widely used today.
a. SLR’s (Single Lens Reflex)
The single-lens reflex (SLR) camera uses a mirror which reflects exactly what will be captured by the film or digital imaging system, as opposed to rangefinder cameras that you view through the viewfinder.
-picture is seen through the lens via mirror.
-many SLR cameras include through-the-lens (TTL) metering.
-The focus can be adjusted manually by the photographer or automatically by the autofocus system.
-widely used, especially by pro photojournalists.
PROS: small, interchangeable lenses, full manual control, very commonly used.
CONS: not many. relatively small negative, not high resolution quality.
b. Point & shoot cameras
 -simple, mostly automatic, consumer-grade.
-can be inexpensive.
-all inclusive; flash, zoom lens, auto-focus, auto exposure.
- "idiot-proof."
-light and compact.
-very limited in terms of manual exposure control, often there are none.
PROS: all-in-one, small and light-weight, full auto control, very commonly used, -flash tends to be ineffective, inexpensive.
CONS: shutter often has lag-time meaning there is a delay; it doesn't capture the photo when you press the button, no interchangeable lenses, relatively small negative, not high resolution quality.
c. Rangefinders
 Most varieties of rangefinder show two images of the same subject, one of which moves when a calibrated wheel is turned; when the two images coincide and fuse into one, the distance can be read off the wheel.
-see picture through rangefinder, not thru lens like an SLR.
-there is no momentary blackout of the subject being photographed
-see subject at all times.
-The viewfinder is offset from the lens, so that the image shown is not precisely what will be recorded on the film.
-usually smaller and less obtrusive.
PROS: the camera is often quiet, small and light-weight, unobtrusive.
CONS: not great with flash, image shown is not precisely what will be recorded on the film, expensive.
2. Medium Format
*Began being used in early 1900’s . Still widely used by commercial, portrait,and art photographers.
Medium format cameras produce much larger images than 35mm cameras resulting in sharper, less grain, and more saturated colors.
Because of their larger size, images have better enlargement quality. There are several formats to choose from.
Most square images are medium format.
Is now available for digital capture.
PROS: better image quality than 35mm.
CONS: larger camera, more delicate, more technical, very expensive.
types pf medium formats
a. 645 (6x4.5mm)

b. 2 ¼ square (6x6mm)OR 2 ¼ rectangular (6x7mm)

3.Large Format

*Began being used in mid 1800’s, widely used in early 1900’s . Still used today by product and studio photographers.
Large format describes large photographic films, large cameras, view cameras and processes that use a film or digital sensor. The most common large formats are 4×5 and 8×10 inches. Less common formats include quarter-plate, 5×7 inches, 11×14 inches, 16x20 inches, 20x24 inches.
Is now available for digital capture.
PROS: Super high quality in terms of sharpness, detail, color, and reproduction.
CONS: Cameras are heavy and cumbersome, must use a tripod in most cases, one photo at a time, sheet film, very technical, image on ground glass appears upside-down, must view image under a dark cloth.
4. Panoramic

*Began being used in early 1900’s . Still widely used today, mainly by landscape photographers.
Panoramic cameras capture images with the appearance of a "panorama."
Panoramic photography is a format that refers to images with exceptionally wide fields of view, very rectangular in shape and size. True panoramic photos capture a field of view comparable to, or greater than, that of the human eye - about 160° by 75°.
Short rotation refers to a lens that rotates around the camera's rear nodal point (the optical point from which the focal length is measured) opposite a curved film plane. As the photograph is taken, the lens rotates, at the same time exposes the vertical strip of film that is aligned with the axis of the lens.
Very similar to viewing a scene by turning your head from side to side on a steady level.
Must keep the camera level, otherwise distortion will occur.
PROS: Very interesting images, very unique look.
CONS: Very expensive, must keep camera level, very delicate, must be technically precise.
 take many images onto a small memory device; usually a compact flash card or memory stick, which can be reused.
Many compact digital still cameras can record sound and moving video as well.
1. Digital SLR's

A digital single-lens reflex camera (digital SLR or DSLR) is a digital camera that uses a mirror system to direct light from the lens through the viewfinder eyepiece.
During exposure (when the photograph is taken), the mirror swings upward, and a shutter opens, allowing the lens to project light onto the image sensor.
Most commonly used camera by working photojournalists.
Uses interchangeable lenses.
PROS: High-end cameras, top-notch quality, all-features available, large LCD screens, large sensors, large file size.
CONS: Expensive, large and heavy, no video capability.
2. Bridge digital cameras
 The term "bridge" characterizes the way in which these cameras fill the niche between the DSLRs and the compact digital cameras.
Bridge digital cameras are comparable in size and weight to the smallest digital single-lens reflex cameras (DSLRs), but they lack the removable lenses, larger sensors, mirror, and reflex system that characterize DSLRs.
PROS: Good to excellent quality, many features available, large LCD screens, large sensors, large file size, less expensive.
CONS: Not as capable as DSLR's, lens quality not as good as as DSLR's, not durable.
3. Compact digital cameras

Designed to be fully automatic, small and portable; the smallest are described as subcompacts or "ultra-compacts". Compact cameras are usually designed to be easy to use, sacrificing advanced features and picture quality for compactness and simplicity.
Often referred to as point-n-shoot, or idiot cameras due to their overly automatized features.
PROS: small and portable, designed to be easy to use, numerous advanced features, all-inclusive features.
CONS: Picture quality are sacrificed for compactness and simplicity, most have a built-in flash usually of low power only sufficient for nearby subjects, delicate.
This site has a good chart comparing point-n-shoots.
II. FILM CAMERAS
1. 35mm (24x36mm)
 *Began being used in 1940’s. Still widely used today.
a. SLR’s (Single Lens Reflex)
The single-lens reflex (SLR) camera uses a mirror which reflects exactly what will be captured by the film or digital imaging system, as opposed to rangefinder cameras that you view through the viewfinder.
-picture is seen through the lens via mirror.
-many SLR cameras include through-the-lens (TTL) metering.
-The focus can be adjusted manually by the photographer or automatically by the autofocus system.
-widely used, especially by pro photojournalists.
PROS: small, interchangeable lenses, full manual control, very commonly used.
CONS: not many. relatively small negative, not high resolution quality.
b. Point & shoot cameras
 -simple, mostly automatic, consumer-grade.
-can be inexpensive.
-all inclusive; flash, zoom lens, auto-focus, auto exposure.
- "idiot-proof."
-light and compact.
-very limited in terms of manual exposure control, often there are none.
PROS: all-in-one, small and light-weight, full auto control, very commonly used, -flash tends to be ineffective, inexpensive.
CONS: shutter often has lag-time meaning there is a delay; it doesn't capture the photo when you press the button, no interchangeable lenses, relatively small negative, not high resolution quality.
c. Rangefinders
 Most varieties of rangefinder show two images of the same subject, one of which moves when a calibrated wheel is turned; when the two images coincide and fuse into one, the distance can be read off the wheel.
-see picture through rangefinder, not thru lens like an SLR.
-there is no momentary blackout of the subject being photographed
-see subject at all times.
-The viewfinder is offset from the lens, so that the image shown is not precisely what will be recorded on the film.
-usually smaller and less obtrusive.
PROS: the camera is often quiet, small and light-weight, unobtrusive.
CONS: not great with flash, image shown is not precisely what will be recorded on the film, expensive.
2. Medium Format

*Began being used in early 1900’s . Still widely used by commercial, portrait,and art photographers.
Medium format cameras produce much larger images than 35mm cameras resulting in sharper, less grain, and more saturated colors.
Because of their larger size, images have better enlargement quality. There are several formats to choose from.
Most square images are medium format.
Is now available for digital capture.
PROS: better image quality than 35mm.
CONS: larger camera, more delicate, more technical, very expensive.
types pf medium formats
a. 645 (6x4.5mm)

b. 2 ¼ square (6x6mm)OR 2 ¼ rectangular (6x7mm)

3.Large Format

*Began being used in mid 1800’s, widely used in early 1900’s . Still used today by product and studio photographers.
Large format describes large photographic films, large cameras, view cameras and processes that use a film or digital sensor. The most common large formats are 4×5 and 8×10 inches. Less common formats include quarter-plate, 5×7 inches, 11×14 inches, 16x20 inches, 20x24 inches.
Is now available for digital capture.
PROS: Super high quality in terms of sharpness, detail, color, and reproduction.
CONS: Cameras are heavy and cumbersome, must use a tripod in most cases, one photo at a time, sheet film, very technical, image on ground glass appears upside-down, must view image under a dark cloth.
4. Panoramic

*Began being used in early 1900’s . Still widely used today, mainly by landscape photographers.
Panoramic cameras capture images with the appearance of a "panorama."
Panoramic photography is a format that refers to images with exceptionally wide fields of view, very rectangular in shape and size. True panoramic photos capture a field of view comparable to, or greater than, that of the human eye - about 160° by 75°.
Short rotation refers to a lens that rotates around the camera's rear nodal point (the optical point from which the focal length is measured) opposite a curved film plane. As the photograph is taken, the lens rotates, at the same time exposes the vertical strip of film that is aligned with the axis of the lens.
Very similar to viewing a scene by turning your head from side to side on a steady level.
Must keep the camera level, otherwise distortion will occur.
PROS: Very interesting images, very unique look.
CONS: Very expensive, must keep camera level, very delicate, must be technically precise.
9/19/08
FALL '08 ASSIGNMENT #3, Selective Focus
ASSIGNMENT #03
(Due 9/29/08)
Selective Focus
SELECTIVE FOCUS is a technique in which one portion of a photograph is in focus, while other elements are blurred out-of-focus. The photographer makes the choice. Remember, the viewer's eye is naturally drawn toward the part of the photo that is in sharp focus. This is achieved by careful focus and employing shallow depth of field through the use of a wide aperture. The subject is isolated from its surroundings, through focus and depth-of-field.
SHOOTING ASSIGNMENT:
Find any subject that is red, can be person or object.
Make two separate photos focused on just the red subject. Only the red subject should be in focus. The background and other object should not be in focus.
1. In the first photo, use your wide-angle lens.
2. In the second, use your telephoto.
Using depth-of-field and selective focus, try to isolate the subject from its surroundings to create a clean, sharp image. Be mindful of the technical issues we’ve discussed in class; such as DOF, movement. Review examples shown in class.
This is a creative and technical assignment. Make strong expressive photos!
Shoot different angles, work the subject.
*Students must complete:
1. Select (1) best photo one of each.
2. use Photoshop to edit images.
3. Be sure to include a caption.
4.SLUG PHOTO AS FOLLOWS:
EXAMPLES:
franklin_ sf_wide.JPG,
franklin_ sf_tele.JPG
5. Place images in the “drop folder”
(remember to save a copy for yourself to you folder)
READING:
Guide to Photojournalism
By Brian Horton
Read pages 1-27 “Introduction”
Visual Journalism
By Christopher Harris & Paul Martin Lester
Read pages 63-86, CHAPTER 4
Documentary Assignments & Manipulated Assignments
CAPTIONING:
Read this: http://lexardigital.typepad.com/davidhonl/2006/02/captioning_your.html
9/15/08
FALL '08 WEEK 2 -September 15, 2008

1. MSNBC'S Ike's Impact slideshow, and more Ike
2. Any work-flow issues?
3. ASSIGNMENT #1, Self Portrait
4. What is Photojournalism?
5. What photos have had an impact on you?
6. Ethic's & Responsibility of a photojournalist.
7.Photo Basic's PART I.
8. ASSIGNMENT #2, Depth-of-field & Motion.
misc:
-please read & follow assignment instructions carefully!
-remember to check email regularly.
-be sure to LOG-OUT at end of class each week.
-be sure to caption & slug images correctly BEFORE placing in DROP folder.
-be sure assignment number and description is included in caption.
-bring camera, with charged batteries, to class each week.
-bring out-take images to class, store in your SLICE folder.
-if u miss an assignment you will lose points. be sure to submit ASAP.
-you are responsible for all material on the BLOG and in the powerpoint, even if we do not cover all the material in class.
9/14/08
FALL '08 PHOTONHEAD'S SIM-CAM

The SimCam is an online camera simulator designed to teach basic photographic principles. Whether you are interested in film or digital photography, the concepts are the same.
Shutter and Aperture
Basic f-stop and shutter - Adjust the camera settings and examine the results to understand the relationship between shutter and aperture.
Film Speed
Learn about film speed - Shoot the same scene with two differant film speeds and compare exposures side by side.
Camera Shake
Learn how to spot and avoid camera-shake - Compare wide-angle and zoom examples side by side.
Subscribe to:
Posts (Atom)