9/29/08

FALL '08 WEEK 4


By now we should be well aware of the technical considerations that determine a photograph, such as aperture, shutter speed, lens selection, and camera types. You should also be familiar with the categories of the "Visual language."

So, in looking at Dorothea Lange's iconic "Migrant Mother," a symbol of the Great Depression era, what can your determine?

Could it be...that some submitted photos are not slugged correctly or contain proper captions....

Be sure to review the Powerpoint Presentations, they contain material not always covered in class, due to time restriction.

Agenda for today's class.


1.Photos of the week; MSNBC
2. Let's look, ASSIGNMENT #3, Selective Focus.
3.
Lesson; Composition
4. ASSIGNMENT #4, Composition
5. ASSIGNMENT, Photojournalist Paper
6. Photo essay; “After the Fire”

9/28/08

FALL '08 COMPOSITION

-the primary factor in good photography.
-the visually creative aspect of image making.
***please refer to the Week 4 Powerpoint Presentation for more examples.

BAD COMPOSITION
a badly composed photo will lesson impact or effect.
MOST COMMON CAUSES OF BAD COMPOSITION:
1. cluttered backgrounds
2. tiny objects, or main subjects in dead center of frame
3. irrelevant space dominating frame
4. background object coming out of ears, heads,etc
5. Unnecessary objects and information inside the frame.
6. DEAD SPACE!!!!
DEAD SPACE
-eliminate all clutter and distractions.
-use the image frame or depth-of-field to clean-up images.
-one of the biggest most common problem with photos.
-compose with the camera whenever possible.
-crop the final image when necessary.
Remember, you want your photos to communicate and have optimum impact.


FUNDAMENTALS OF GOOD COMPOSITION

1. Rule of Thirds
a.off center placement of subject
b. center is usually NOT satisfying resting place for eye
c. when subject is centered, viewer is unlikely to explore other areas
d. compose image so there is secondary subject for eye to explore


photo by Thomas E. Franklin \ The Record


2. Framing

a. find object in foreground to use as a frame for primary subject
b. framing object should have aesthetic value
ex. doorway, archway, overhanging branches, people, etc
c. frame should compliment subject


photo by Thomas E. Franklin \ The Record


3. Dramatic Sky

a. emphasize skies by placing horizon low in frame, rule of thirds.


photo by Thomas E. Franklin \ The Record


4. Leading Lines
a. find an element that will lead viewer’s eye into the image.
***just because a photo has lines or visual elements in the shape of lines, does not mean the photo is a leading lines image. note the difference.


5. Layering
a. Create Depth
b. create foreground, middle ground, background.
c. very effective compositional technique in creating memorable, lasting images, especially when there are multiple layers to attract the eye.


photo by Thomas E. Franklin \ The Record


photos by John Stanmeyer / VII

6. Fill Frame
a. fill the composition with the subject.
b. usually shot with long lens (telephoto).
c. often has immediate impact.


photos by Thomas E. Franklin \ The Record

7. Juxtaposition
a. visually opposing subjects within a photo.
b. often conveying irony, or play between two objects or subjects.
c. one of the most effective and powerful story-telling devices.


photo by Thomas E. Franklin \ The Record


photo by James Nachtwey \ VII


photo by Keith Carter


8.Silhouette
a. view of an object or scene consisting of the outline and a featureless interior.
b. dark subject, often in complete shadow, in front of a light background.


photos by Thomas E. Franklin \ The Record

9/27/08

FALL '08 ASSIGNMENT -Photojournalist Paper

Photojournalist Paper
Due 11/3/08

Each student will be required to select and contact a working photojournalist of choice, accompany them on an assignment, conduct an interview and write a paper on the experience.
The project will require research and preparation, and the ability to contact and meet with the photojournalist. Every effort should be made to try and accompany the photojournalist on an assignment.
***WEDDING & COMMERCIAL PHOTOGRAPHERS ARE NOT PERMITTED. WORKING PHOTOJOURNALISTS & NEWS PHOTOGRAPHERS ONLY! SELECT SOMEONE WITH REAL EXERIENCE –at least 5 years.
The goal of this presentation is for students to learn something about the field of photojournalism, which is undergoing cataclysmic changes, from a working professional who can offer insight. In addition to the list of questions below, students should prepare their own set of questions. Research on photographer’s background should be completed BEFORE interview session.
Be inquisitive. Get their advice. Get a sense of the photographer’s attitude, style, and perspective. This is a unique opportunity to get some real career insight, even in photojournalism is not in your future. There is much that can be learned from professionals in related fields. Make the most of the opportunity.

1. The written paper should be minimum 2000 words (2-3 pages, no more), and written in the student’s own words..
The written report must be a WORD document.
-12pt font, single-space, and submitted to the DROP FOLDER.
2. Shoot your own photo of the photojournalist, hopefully in action.
-Copy and paste 1-2 photos into WORD document.
3. The paper MUST follow this outline:
I.BACKGROND
-Why was photographer selected?
-What is the photographer’s background?
-How did they get interested and started?
-Etc.
II. PHOTOGRAPHY WORK
-What type of work or projects is the photographer known for?
-List examples, and gives description.
-Copy and paste at least 2 photos into WORD document.
-Who do they work for now, in the past?
-Describe their job/assignments.
Etc.
III. JOB
-Describe their job/assignments.
-What aspects of their jobs are most satisfying?Least satisfying?
-What advice do they have for young journalists?
-What are the most important skills to have to be a successful photojournalist?
-What changes in the business have they experienced?
-What does the future hold for photojournalists?

DO’s AND DON’Ts:

-Do not wait until the last minute to contact the photographer. DO IT NOW!
-Do not expect the photographer to get back to you immediately, if at all.
-Be persistent and assertive, and don’t wait for returned calls. Be proactive.
-Do research BEFORE contacting them. Impress them with what you already know about them. This will most likely lead to a better interview, and will show respect for their time.
-Ask for help in making initial contact.
-Make every opportunity to accompany them on an assignment.

Where to find a photojournalist?
-Get in the habit of looking for credits under published photos.
-your local newspaper
-Visit photojournalism web sites:
www.njppa.org (New Jersey Press Photogs Association)
www.nppa.org (National Press Photogs Association)
www.digitaljournalist.org Dirck Halstead (very important site!)
www.sportshooter.com (not just sports)
http://www.aphotoaday.org/ (a photo a day web site & blog)

-The Star-Ledger
-The Record
-The Asbury Park Press
-The Herald News
-The NY Times

-Review the PPP’s.
-Ask me.

FALL '08 ASSIGNMENT #04; Composition

ASSIGNMENT #05
(Due 10/6/08)
Composition (2) parts

READING:
Guide to Photojournalism
By Brian Horton
Read pages 79-101“Features and Portraits; Seeing the World Around Us.”


PART 1: Make a Graphic photograph using “Rule of Thirds.
PART 2: Make a Graphic photograph using one of these compositional techniques: Framing, Leading Lines, Juxtaposition, or Silhouette.
****CAPTION MUST STATE WHICH TECHNIQUE YOU ARE USING!
Remember, a Graphic Photograph is visual, emphasizes the relationship between the lines, shapes and forms produces an aesthetically pleasing visual presentation.
It is NOT about the subject content as much as the visual content.
Graphic elements are more important than the story-telling content with this assignment.
Photo should have exceptionally strong composition, and be visually pleasing.
This should be a photo that is as much about the “visual elements,” as it is about the content and subject.
Take a look at the world around us, and make a visually interesting photograph.
This should not be a portrait.
Review examples showed in class and Power Point Presentation.
This should be a photo about Graphic Elements above all else.
THE GRAPHIC ELEMENTS SHOULD BE OBVIOUS, AND EMPHASIZED!


*Students must complete:
1. Select (1) best photo. 2. Follow “Basic Photoshop”, use outline provided if needed.
3. Type complete caption in FILE INFO field in Photoshop, see instructions. 4.SLUG PHOTO AS FOLLOWS: Last name_ composition1.jpg, Last name_ composition2.jp 5. Place image in the “drop folder”
(remember to save a copy for yourself to you folder)

9/21/08

FALL '08 WEEK 3

photo by THOMAS E. FRANKLIN

Good-morning.
Welcome to Week 3.
Wow, I was very impressed with the photos from Week 1, we saw some really nice self-portraits and photos of self-expression. Let's keep up the good work.


Housekeeping:
-when reviewing the Powerpoint presentation, copy the PPP file to your HD then open from there. (Opening a large file like that across the server will put a drain on server, and in some cases crash)
-do NOT put folders in the DROP folder, just drag and drop the images solo. Thank you.
-be sure to CAPTION every submitted photo, otherwise 1pt will subtracted from each assignment.
-be sure to slug each photo correctly,
otherwise 1pt will subtracted from each assignment.
-check the Graded Assignments Folder.

Agenda for today's class.

1. Damon Winter on Obama Trail
2. Any work-flow issues?
3. Let's look, ASSIGNMENT #2, Depth-of-field & Motion.
4. Ethic's & Responsibilities;
See NPPA Code
5.
The Visual Language
6. Photo Basic's PART II; Cameras
7.
Photo Basic's PART III; Lenses
8. ASSIGNMENT #3, Selective Focus
9. Photo essay; “Bound to El Norte”

9/20/08

LENSES

LENSES:
Wide-angle Lens:
 A lens that has a shorter focal length and a wider field of view (includes more subject area) than a normal lens.
Zoom Lens:
 A lens in which you adjust the focal length over a wide range. In effect, this gives you lenses of many focal lengths.
Telephoto Lens: A lens that makes a subject appear larger on film than does a normal lens at the same camera-to-subject distance. A telephoto lens has a longer focal length and narrower field of view than a normal lens. -KODAK: A Glossary of Photographic Terms


OPTICAL vs.DIGITAL ZOOM
Most consumer-grade digital cameras offer optical and digital zoom.
Ignore the digital zoom.
Your photos will be at their sharpest with the optical zoom, turn off the digital zoom. Why?

Optical zoom uses the optics of the lens of the camera to bring the subject closer. Digital zoom is an invention that enlarges that image within the camera.
Optical zoom
is what the lens actually sees. This is what matters most.
-optical zoom is a true zoom.
It's focal length actually extends and retracts. An image is magnified by the lens itself.
-An optical zoom produces quality images.
-A zoom lens is used to magnify an image 3X, 4X, 10X and more.
-If you want to zoom in close to distant objects, buy a camera with the longest zoom you can afford.
-NOTE: Very long zooms are prone to camera shake, particularly in low light. To help prevent this, some digital cameras have image stabilization.
Digital zoom uses in-camera technology to enlarge the pixels in the image the optical zoom captures, then enlarges them. The result is poor; loss of sharpness, color, and image detail.
A digital zoom is not a true zoom.
-It is a simulated zoom that enlarges the central portion of an image.
-The actual length of the lens does not change.
-A digital zoom pre-crops the center area of an image. Resolution is reduced, giving the appearance of zooming in.
-It is similar to cropping with photo editing software.
-A digital camera may have an option to turn off the digital zoom.TURN IT OFF!

Optical Zoom vs. 35mm lens
-Expressing focal lengths in terms of 35mm equivalent makes it easier for individuals to understand so they can compare digital camera lenses.
-The focal length is the same on all 35mm cameras because the size of the film each uses is the same.
-Digital cameras, however, have different focal lengths because the size of their image sensors vary from one camera to another.
-3x optical zoom on one digital camera may not give the same magnification as another with a 3x zoom.
EXAMPLE: The Nikon 5400 has a 4x zoom, which has a 116mm equivalent focal length. But Nikon 5200, which has a 3x zoom, has a 115mm equivalent focal length.
-Not much difference yet one is a 3x and the other is 4x. This is why it's important to ask the 35mm equivalent when looking for a specific focal length.

FOCUS
Digital cameras have different methods of focusing, so check the manual.

When using an automatic mode, focus is locked when the shutter-release button is pressed half-way down. Correct use of the two-step shutter button is key to obtaining proper focus.

The LCD or electronic viewfinder indicates when, and sometimes where, focus is locked.
Usually there is a visual indicator, such as a small lamp or change in color of the focus indicator, that confirms when focus is achieved.

Focus is fixed until you press the focus button again or switch to a different focus mode.

CAMERA TYPES

I. DIGITAL CAMERAS
A digital camera takes still photographs digitally by recording images on a light-sensitive sensor. Digital cameras often feature an LCD screen that display captured images immediately after it is recorded. They also have the capacity to take many images onto a small memory device; usually a compact flash card or memory stick, which can be reused.

Many compact digital still cameras can record sound and moving video as well.

1. Digital SLR's

A digital single-lens reflex camera (digital SLR or DSLR) is a digital camera that uses a mirror system to direct light from the lens through the viewfinder eyepiece.
During exposure (when the photograph is taken), the mirror swings upward, and a shutter opens, allowing the lens to project light onto the image sensor.
Most commonly used camera by working photojournalists.
Uses interchangeable lenses.

PROS: High-end cameras, top-notch quality, all-features available, large LCD screens, large sensors, large file size.
CONS: Expensive, large and heavy, no video capability.

2. Bridge digital cameras
The term "bridge" characterizes the way in which these cameras fill the niche between the DSLRs and the compact digital cameras.

Bridge digital cameras are comparable in size and weight to the smallest digital single-lens reflex cameras (DSLRs), but they lack the removable lenses, larger sensors, mirror, and reflex system that characterize DSLRs.
PROS: Good to excellent quality, many features available, large LCD screens, large sensors, large file size, less expensive.
CONS: Not as capable as DSLR's, lens quality not as good as as DSLR's, not durable.

3. Compact digital cameras
Designed to be fully automatic, small and portable; the smallest are described as subcompacts or "ultra-compacts". Compact cameras are usually designed to be easy to use, sacrificing advanced features and picture quality for compactness and simplicity.

Often referred to as point-n-shoot, or idiot cameras due to their overly automatized features.

PROS: small and portable, designed to be easy to use, numerous advanced features, all-inclusive features.
CONS: Picture quality are sacrificed for compactness and simplicity, most have a built-in flash usually of low power only sufficient for nearby subjects, delicate.
This site has a good chart comparing point-n-shoots.


II. FILM CAMERAS


1. 35mm (24x36mm)
*Began being used in 1940’s. Still widely used today.
a. SLR’s (Single Lens Reflex)
The single-lens reflex (SLR) camera uses a mirror which reflects exactly what will be captured by the film or digital imaging system, as opposed to rangefinder cameras that you view through the viewfinder.
-picture is seen through the lens via mirror.
-many SLR cameras include through-the-lens (TTL) metering.
-The focus can be adjusted manually by the photographer or automatically by the autofocus system.
-widely used, especially by pro photojournalists.
PROS: small, interchangeable lenses, full manual control, very commonly used.
CONS: not many. relatively small negative, not high resolution quality.

b. Point & shoot cameras
-simple, mostly automatic, consumer-grade.
-can be inexpensive.
-all inclusive; flash, zoom lens, auto-focus, auto exposure.
- "idiot-proof."
-light and compact.
-very limited in terms of manual exposure control, often there are none.
PROS: all-in-one, small and light-weight, full auto control, very commonly used, -flash tends to be ineffective, inexpensive.
CONS: shutter often has lag-time meaning there is a delay; it doesn't capture the photo when you press the button, no interchangeable lenses, relatively small negative, not high resolution quality.
c. Rangefinders

Most varieties of rangefinder show two images of the same subject, one of which moves when a calibrated wheel is turned; when the two images coincide and fuse into one, the distance can be read off the wheel.
-see picture through rangefinder, not thru lens like an SLR.
-there is no momentary blackout of the subject being photographed
-see subject at all times.
-The viewfinder is offset from the lens, so that the image shown is not precisely what will be recorded on the film.
-usually smaller and less obtrusive.
PROS: the camera is often quiet, small and light-weight, unobtrusive.
CONS: not great with flash, image shown is not precisely what will be recorded on the film, expensive.
2. Medium Format
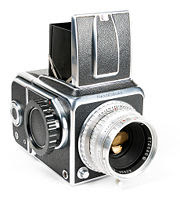
*Began being used in early 1900’s . Still widely used by commercial, portrait,and art photographers.

Medium format cameras produce much larger images than 35mm cameras resulting in sharper, less grain, and more saturated colors.
Because of their larger size, images have better enlargement quality. There are several formats to choose from.

Most square images are medium format.

Is now available for digital capture.

PROS: better image quality than 35mm.
CONS: larger camera, more delicate, more technical, very expensive.

types pf medium formats
a. 645 (6x4.5mm)


b. 2 ¼ square (6x6mm)
OR 2 ¼ rectangular (6x7mm)


3.Large Format


*Began being used in mid 1800’s, widely used in early 1900’s . Still used today by product and studio photographers.

Large format describes large photographic films, large cameras, view cameras and processes that use a film or digital sensor. The most common large formats are 4×5 and 8×10 inches. Less common formats include quarter-plate, 5×7 inches, 11×14 inches, 16x20 inches, 20x24 inches.

Is now available for digital capture.

PROS: Super high quality in terms of sharpness, detail, color, and reproduction.
CONS: Cameras are heavy and cumbersome, must use a tripod in most cases, one photo at a time, sheet film, very technical, image on ground glass appears upside-down, must view image under a dark cloth.
4. Panoramic


*Began being used in early 1900’s . Still widely used today, mainly by landscape photographers.

Panoramic cameras capture images with the appearance of a "panorama."

Panoramic photography is a format that refers to images with exceptionally wide fields of view, very rectangular in shape and size. True panoramic photos capture a field of view comparable to, or greater than, that of the human eye - about 160° by 75°.

Short rotation refers to a lens that rotates around the camera's rear nodal point (the optical point from which the focal length is measured) opposite a curved film plane. As the photograph is taken, the lens rotates, at the same time exposes the vertical strip of film that is aligned with the axis of the lens.

Very similar to viewing a scene by turning your head from side to side on a steady level.

Must keep the camera level, otherwise distortion will occur.
PROS: Very interesting images, very unique look.
CONS: Very expensive, must keep camera level, very delicate, must be technically precise.

9/19/08

FALL '08 ASSIGNMENT #3, Selective Focus

ASSIGNMENT #03
(Due 9/29/08)
Selective Focus

SELECTIVE FOCUS is a technique in which one portion of a photograph is in focus, while other elements are blurred out-of-focus. The photographer makes the choice. Remember, the viewer's eye is naturally drawn toward the part of the photo that is in sharp focus. This is achieved by careful focus and employing shallow depth of field through the use of a wide aperture. The subject is isolated from its surroundings, through focus and depth-of-field.

SHOOTING ASSIGNMENT:
Find any subject that is red, can be person or object.
Make two separate photos focused on just the red subject. Only the red subject should be in focus. The background and other object should not be in focus.
1. In the first photo, use your wide-angle lens.
2. In the second, use your telephoto.

Using depth-of-field and selective focus, try to isolate the subject from its surroundings to create a clean, sharp image. Be mindful of the technical issues we’ve discussed in class; such as DOF, movement. Review examples shown in class.

This is a creative and technical assignment. Make strong expressive photos!
Shoot different angles, work the subject.

*Students must complete:
1. Select (1) best photo one of each.
2. use Photoshop to edit images.
3. Be sure to include a caption.
4.SLUG PHOTO AS FOLLOWS:
EXAMPLES:
franklin_ sf_wide.JPG,
franklin_ sf_tele.JPG
5. Place images in the “drop folder”
(remember to save a copy for yourself to you folder)

READING:
Guide to Photojournalism
By Brian Horton
Read pages 1-27 “Introduction”

Visual Journalism
By Christopher Harris & Paul Martin Lester
Read pages 63-86, CHAPTER 4
Documentary Assignments & Manipulated Assignments

CAPTIONING:
Read this: http://lexardigital.typepad.com/davidhonl/2006/02/captioning_your.html

9/15/08

FALL '08 WEEK 2 -September 15, 2008


1. MSNBC'S Ike's Impact slideshow, and more Ike
2. Any work-flow issues?
3. ASSIGNMENT #1, Self Portrait
4. What is Photojournalism?
5. What photos have had an impact on you?
6. Ethic's & Responsibility of a photojournalist.
7.Photo Basic's PART I.
8. ASSIGNMENT #2, Depth-of-field & Motion.

misc:
-please read & follow assignment instructions carefully!
-remember to check email regularly.
-be sure to LOG-OUT at end of class each week.
-be sure to caption & slug images correctly BEFORE placing in DROP folder.
-be sure assignment number and description is included in caption.
-bring camera, with charged batteries, to class each week.
-bring out-take images to class, store in your SLICE folder.
-if u miss an assignment you will lose points. be sure to submit ASAP.
-you are responsible for all material on the BLOG and in the powerpoint, even if we do not cover all the material in class.

9/14/08

FALL '08 PHOTONHEAD'S SIM-CAM


The SimCam is an online camera simulator designed to teach basic photographic principles. Whether you are interested in film or digital photography, the concepts are the same.

Shutter and Aperture
Basic f-stop and shutter - Adjust the camera settings and examine the results to understand the relationship between shutter and aperture.

Film Speed
Learn about film speed - Shoot the same scene with two differant film speeds and compare exposures side by side.

Camera Shake
Learn how to spot and avoid camera-shake - Compare wide-angle and zoom examples side by side.

SP '09 NPPA Code of Ethics

National Press Photographer's Association NPPA

Photojournalists operate as trustees of the public. Our primary role is to report visually on the significant events and on the varied viewpoints in our common world. Our primary goal is the faithful and comprehensive depiction of the subject at hand. As photojournalists, we have the responsibility to document society and to preserve its history through images.

Photographic and video images can reveal great truths, expose wrongdoing and neglect, inspire hope and understanding and connect people around the globe through the language of visual understanding. Photographs can also cause great harm if they are callously intrusive or are manipulated.

This code is intended to promote the highest quality in all forms of photojournalism and to strengthen public confidence in the profession. It is also meant to serve as an educational tool both for those who practice and for those who appreciate photojournalism. To that end, The National Press Photographers Association sets forth the following Code of Ethics:

Code of Ethics
Photojournalists and those who manage visual news productions are accountable for upholding the following standards in their daily work:
1. Be accurate and comprehensive in the representation of subjects.
2. Resist being manipulated by staged photo opportunities.
3. Be complete and provide context when photographing or recording subjects. Avoid stereotyping individuals and groups. Recognize and work to avoid presenting one's own biases in the work.
4. Treat all subjects with respect and dignity. Give special consideration to vulnerable subjects and compassion to victims of crime or tragedy. Intrude on private moments of grief only when the public has an overriding and justifiable need to see.
5. While photographing subjects do not intentionally contribute to, alter, or seek to alter or influence events.
6. Editing should maintain the integrity of the photographic images' content and context. Do not manipulate images or add or alter sound in any way that can mislead viewers or misrepresent subjects.
7. Do not pay sources or subjects or reward them materially for information or participation.
8. Do not accept gifts, favors, or compensation from those who might seek to influence coverage.
9. Do not intentionally sabotage the efforts of other journalists.

Ideally, photojournalists should:
1. Strive to ensure that the public's business is conducted in public. Defend the rights of access for all journalists.
2. Think proactively, as a student of psychology, sociology, politics and art to develop a unique vision and presentation. Work with a voracious appetite for current events and contemporary visual media.
3. Strive for total and unrestricted access to subjects, recommend alternatives to shallow or rushed opportunities, seek a diversity of viewpoints, and work to show unpopular or unnoticed points of view.
4. Avoid political, civic and business involvements or other employment that compromise or give the appearance of compromising one's own journalistic independence.
5. Strive to be unobtrusive and humble in dealing with subjects.
6. Respect the integrity of the photographic moment.
7. Strive by example and influence to maintain the spirit and high standards expressed in this code. When confronted with situations in which the proper action is not clear, seek the counsel of those who exhibit the highest standards of the profession. Photojournalists should continuously study their craft and the ethics that guide it.

9/11/08

FALL '08 FALLING MAN VIDEO

Here is an interesting video on one of the most controversial photos from 9/11.

"Falling Man" was taken by AP photographer Richard Drew at 9:41:15 a.m., on September 11, 2001. It shows a man jumping or falling from the WTC towers. The photograph provoked anger, particularly in the United States, in the aftermath of 9/11.

It is believed to Jonathan Briley, who worked in the North Tower restaurant and was identified by chef Michael Lomonaco. He was also identified by his brother. Read more.


FALL '08 REMEMBERING 9/11

Here's my recent video, "Remembering 9/11."


This week marks the 7th anniversary of the terrorist attacks on New York. Hard to believe. To commemorate this important date, I put together some words and pictures that tell the story of my experiences covering the tragic events that day. Working on this piece and reviewing all my raw images from that day, brought back a rush of memories and emotions.

Many of the photos in this multimedia project have never been published before, and it was interesting to match the images to the words I wrote for the audio. To see it come together as a narrative was satisfying, despite the somber and devastating subject matter.
The Record published my story.

The Record's website NorthJersey.com did a 9/11 Anniversary live blog today, a comprehensive running report on today's commemorative events.

9/8/08

FALL '08 WELCOME to PHOTOJOURNALISM (COMM 329) Fall 2008

Welcome To Thomas E. Franklin's Photojournalism class, Ramapo College (COMM 329) Fall 2008.


In this course students will be introduced to the contemporary practices of photojournalism, and explore the aesthetic, technical, cultural, and historical forces that have shaped its evolution as a form of visual communication.


The emphasis of this course will be on picture taking, not picture developing.


Read the complete syllabus for this course.


9/7/08

FALL '08 WEEK 1

1. Please complete Student Info Sheet, and hand back to Professor Franklin.
2. Please log-in to one of the awesome MC computers that line the room. Login LABS (no password required)
3.Have a SLICE. Let's connect to the college server called SLICE. This where it ALL happens.
4. Who are You?
5. Who am I?
6. Let's take a break already.
7. Syllabus for this course. Let's take a look.
8. Camera's. Show me whatcha got?
9. Work-flow method.
10. Assignment #01; Self Portrait
11. Captions. The who, what, when, where, why.
12. Franklin's Top-10
13. Damon Winter's Obama campaign photos.
14. What photo(s) have had an impact on you? On society?

FALL '08 PHOTOS WITH IMPACT

FALL '08 ASSIGNMENT #01

ASSIGNMENT #01

READING:
National Geographic Field Guide
By Peter K. Burian & Robert Caputo
“Essential Basics; Getting Started” pages 1-23
“Essential Basics; Camera’s & Lenses” pages 34-75

“Make a self-portrait”
(Due 9/15/08)
Make a self-portrait photo.
Photo should be a reflection of who you are, an example of self-expression.
Make a self-portrait photo that communicates something about who you are.
Be as creative and technically precise as you can be. Use self-timer, and tripod if necessary.
Figure out how to use your self-timer. DO NOT have someone else take the photo.
This shoot should include some forethought and planning.
Shoot more than one idea/take.
*Students must complete:
1. Select (1) best photo.
2. Caption photo in Photoshop (see caption instructions)
3. SLUG PHOTO AS FOLLOWS:
Last name space self.jpg
EXAMPLE: franklin_self.JPG
4. Place one jpg image in the “drop folder”
(Remember to save a copy for yourself to your folder)

FALL '08 FRANKLIN'S TOP-10 REASONS...

FRANKLIN'S TOP-10 REASONS you will get an A in this class:
10. It ain't rocket science.
9. They say, "A picture's worth a thousand words" and you want to prove it.
8. Because you will come to class on-time.
7. Because you will be an active and thoughtful participant in classroom discussions.
6. You will laugh at my weak jokes & silly insight's. (The more u laugh, the better ur photos look)
5. So....you say you need to pass this class to graduate?
4. Because you always wanted to learn Photoshop.
3. You you will NEVER use Photoshop to get rid of your boyfriend's I love u Mom tattoo...or any other content from a photo.
2. Because you never knew, until now, that a photograph could change the world.
1. Photojournalism is soooo much more interesting than Professor Sforza's dull newspaper class.

FALL '08 DAMON WINTER ON OBAMA TRAIL

Damon Winter, a NY Times staff photographer, has been covering the Barack Obama campaign including the recent Democratic National Convention. The Times created this audio slide show feature his work and narration. Really nice imagery and presentation, see "Photographer's Journal; Following Obama." by Damon Winter.